Gardening

Windowfarm Hydroponics Version 1

It’s been a few years since I tried any hydroponics, but now that we have a place with nice big windows I’m trying my hand at a windowfarm. Windowfarms are drip planting systems that are set up vertically, making them great for places without a lot of outdoor gardening space.

Two dwarf sweet pea plants

Windowfarms are made from plastic bottles stacked vertically. A small airpump lifts water from the reservoir at the bottom to the topmost bottle, where it then trickles down over each plant. The plants, which were started in root plugs, are sitting in 3″ net cups filled with expanded clay pellets. The pellets offer root support for the plant, and retain water while still allowing plenty of oxygen flow.

IMG_5988

My set up is, in a word, ugly. Eventually I plan on having four columns hanging in the window, and with any luck they’ll get more attractive as I go along.

IMG_6006

I used a large plastic orchid pot to hide the water reservoir, which is simply an upside-down water bottle with a coil of 1/4″ tubing coming out the cap. The blue tray is leftover from a previous hydroponics experiment, and is there to hold the bottle vertically.

IMG_5987

To make the joint between the cap and the tubing water tight, I sacrificed the barbed end of a plastic hose connector and pushed it into the cut end of the tubing. This pushes out the sides of the tubing and keeps water from escaping.

IMG_6004

The water line is about 3 feet long and runs up to a t-joint, which you can just barely see in the photo of the reservoir. Airline tubing from the air pump comes in from the side, and the black tubing carries water up to the top of the plant column.

The basic theory of the system is that water comes up from the bottom and is then pushed up the black drip tubing by air from the air pump. Undergravel filters in aquariums work on a similar principal. Getting it to actually work is a trial and error process, and your reservoir needs to be high enough above the t-joint to keep the water pressure up.

The air pump also needed some tweaking to work well. Too much air and you get a noisy system that doesn’t lift water well, too little air and you get a quiet system that doesn’t lift water well. I found a nice four-way adjustable valve on Amazon which allows me to carefully adjust the airflow.

The system is on for 15 minutes every two hours, which I’ll increase as the plants grow. I’ve planted dwarf sugar peas, tomatoes, and basil so far. With any luck I’ll have something edible in a few months.

Cooking

It Came From the Internet: Recipes

Things have been really busy around here, but sadly not with stuff that makes for interesting blog posts. In the meantime, here are some of the recipes I’ve been compulsively hoarding, holding out for the day when I actually have time to do some cooking / baking.

For the fantasy world in which I hold fancy dinner parties, prosciutto asparagus sprials.

Pizza muffins. Or, things I can throw in the freezer and then eat later when RevolvingDork isn’t around to feed me.

Strawberry Basil Margaritas. In ~6 weeks my basil plants will be fully grown, and I’ll be able to drink alcohol again. Coincidence?

Sweet Potato Veggie Burger. I’m not that into veggie burgers, but I am into sweet potatoes and avocado.

What’s on your recipe to-do list?

RevolvingDork loads the bookshelves
New Construction Townhome

Built-in Bookcases by Ikea

RevolvingDork loads the bookshelves

RevolvingDork and I have completed our first DIY home improvement project together: built in bookcases for our living room. It was only a little nerve wracking to coordinate on a project where neither of us really knew what we were doing.

We used Billy Bookcases, closely following the example from Centsational Girl’s blog. After trying a few different combinations we went with four full-width and one half-width bookcase. In between each bookcase is a strip of 1 11/16th inch moulding. We were able to pull up and reuse the floor moulding from the back wall (though as you can see in the photo above we need to get new quarter-round shoe moulding).

IMG_5923

Our base moulding is pretty tall, and because we planned to install doors we needed to make sure the bottom edge of the lowest shelf was above the moulding. All together we needed to raise the bookshelves by 2 and a half inches. We built a frame out of two by fours, and nailed little wooden “feet” to the bottom to get things to the right height.

IMG_5927

Like most houses, our walls and floor are not perfectly square so we had to fudge things a little bit to get them to line up. We used some scraps of the flat moulding as shims to convince the bookshelves to line up correctly. Conveniently, the crown moulding at the top hides any uneven edges between the bookcases. Once everything was in place we painted all the moulding to match the trim.

IMG_5933

I’ve seen a lot of Billy build-ins, but none with doors. The doors weren’t quite as much of a problem as we’d expected; you can get away with up to 1/4″ thick moulding before you have to re-drill and reposition the mounting holes for the door hinges.

IMG_5935

The bookcases themselves came in at $500 (more than half of which was the doors), and we spent about another $150 on wood, moulding, nails, etc. Despite being very crafty / hackery, neither of us is very handy so don’t have much in the way of spare lumber or hardware lying around. Thankfully we were able to borrow a compound miter saw from RD’s dad. We started the project on Wednesday and finished it Saturday morning, though it took longer than it needed to because we don’t have a car to easily get large things from the hardware store.

It may not be the most technically perfect bookshelf in the world (don’t look too closely at the mitered base moulding…) but we’re pretty proud of our first home improvement project. As a bonus, the living room is finally a livable space instead of a box maze.

Living Room Unpacked

New Construction Townhome

Installing a Modular Rug

We used the Flor modular rug system in our TV room, which is made up of individual carpet squares you assemble yourself.

Each square is 20 by 20 inches. On the underside of each intersection is a small sticker which holds the pieces together. The rubbery backing on the carpet squares keep them from sliding around too much.

Flor Corner In Progress

For the border pieces we cut the squares into thirds. To make the corners line up evenly we needed an extra 2/3 length border piece on the end of the border row.

Flor Corner Done

When it’s done you can’t tell that the pieces are separate, though there are a few “fuzzies” that need to be vacuumed up. My cuts weren’t quite as clean as the factory edges, so I turned the cut edge of each border piece in towards the center of the rug. The pieces with two cut edges were used at the back of the rug (shown above), which will eventually be covered by a couch so no one will see it.

Overall we’re happy with how it came out, and will likely use the Flor squares in a few other places.

PS, notice something different? My blog images are now watermarked, something I’m going to try for a bit. You can read about why I’ve decided to go this route over on the main blog.

Organization

Kellbot’s Guide to a Successful Move

In New York, moving frequently seems to be the norm. The longest most people stay in once place is a few years, and many of my friends move every year. And yet for some reason, a lot of people are kind of… bad at moving. Our recent move from the New York area to Philadelphia went really smoothly, and I’ll share our secrets.

A good move is low stress and over in time for an early dinner. A bad move involves lots of last minute freak-outs and unloading the moving van in the dark. Whether you’re hiring someone to do the heavy lifting or rounding up 6 of your closest friends, you want to be a good mover. Being a good mover isn’t hard, but it does take a little planning.

Sort before packing begins

There are really three phases to moving: sorting through all your junk, putting it into boxes, and then moving them to your new home. The only thing you should be doing on moving day is the last one! Sorting includes taking care of things you’ve been putting off, like filing things properly or culling your shoe collection. It can go to a thrift store, Craigslist, or the trash/recycle bin, but you should get rid of anything you don’t want to bring with you well before packing begins.  Trying to do both at once is just an exercise it exhaustion. You can start sorting the moment you suspect you might be moving – the worst case scenario is you end up staying where you are in your newly junk-free space.

Give yourself an appropriate amount of time to pack

Waiting too late to pack is obviously a bad idea, but there’s also something to be said for not starting too early. As tempting as it is to start packing your books right away, living out of boxes for weeks makes your move feel longer. By sorting through stuff before packing begins, it’s easy to quickly put things into boxes when it’s time.

How much time you need depends largely on how much stuff you have, but for our two bedroom apartment I gave myself one week. My husband, who isn’t nearly the pack rat I am, did all of his packing in two days. We had the luxury of being able to set aside entire days right before the move, so if you’re cramming moving around a full work schedule you’ll likely need longer.

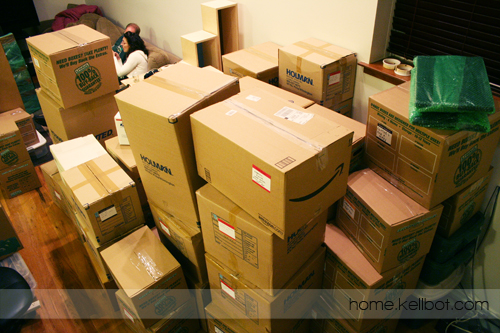
Pack your belongings in honest-to-god boxes

This is the chief offense I’ve seen in bad moves. You need boxes. Boxes that close and can be stacked. Stuffing your belongings into tote bags or carrying them out by the armful is a great way to make your move take three times as long as it needs to.

There are lots of place to get boxes: you can buy them from a moving company or find them used.  You can often find free moving boxes on Craigslist or Freecycle, or ask a local business to save boxes for you. You can scrounge them off the street on recycling day, but since a lot of stores destroy the boxes to break them down you’ll get better quality boxes if they’re actually saving them for you.

Furniture should be empty

Not only does your chest of drawers weigh a ton with all that stuff in it, but the most likely outcome if you try and move it full is that the drawers will fall out and all of your belongings will tumble into the street. Remember: stuff goes in boxes. Furniture is not a box. Therefore, stuff does not go in furniture. This includes those plastic drawer units, which are not boxes, and therefore should be empty.

On the subject of furniture: furniture pads are awesome! We rented three dozen for a total of $15, and they came in incredibly handy. Not only are they good for wrapping up your furniture, but they can be shoved into gaps between odd shaped items to keep your stuff from sliding around.

Use small boxes for books, and pretty much everything else

The biggest box you should fill with books and other heavy items is a 1 foot cube. Beyond that, you’re going to end up destroying your back, the box, or both. Have mercy on your moving help, and use small boxes for books.

In fact, we used very few boxes that were larger than 18 x 18 x 12 inches (uhaul’s “medium”), and even then we had a number of boxes that were just too heavy. Your mileage will vary depending on the kind of stuff you own, but since very little of what we have is larger than 12 inches in any dimension, I wish I’d used fewer “medium” sized boxes and more smalls.
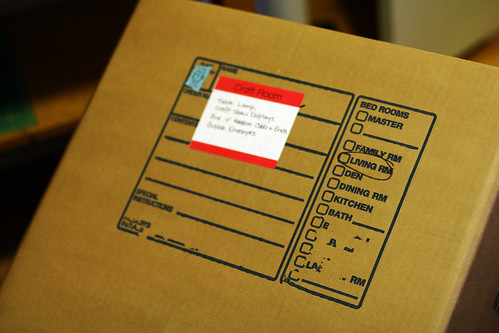
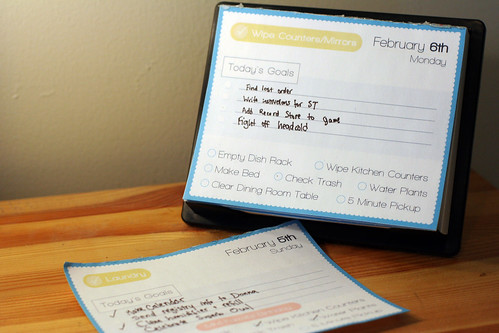
IMG_5862

Label your boxes

Write which room the box came from on the side, or use sticky labels if you’re feeling organized. That way you know where to deposit each box in your new place, and can easily find anything you suddenly realized you desperately need. The somewhat OCD color coded labels I used were really helpful, it made it easy for me to see at a glance which room each box was going to. The downside is that now our entire family is keenly aware of the insane amount of craft supplies I own – it seemed like about 1/3 of the boxes were labeled “craft room.”

Have enough help

You need a minimum of two strong people.  Three sturdy folks can load a properly packed two bedroom apartment into a truck in a little over two hours, so if you’ve got more stuff, aren’t so sturdy, live in a 5th floor walk-up, or didn’t pack well you’re going to need more people. If you’re out of strong friends, check Craigslist for hiring help. In our area, $120 gets you two guys with giant arms for two hours.

Be upbeat, even if you’re stressed

I snapped at RevolvingDork when we were loading the van, over something dumb, and immediately regretted it. Even when things go smoothly it’s stressful to move, don’t add to the problem by being a pill. Try to remember that your stuff is just that – stuff. Obviously you want your belongings to get from point A to point B without damage, but yelling at people isn’t actually the best way to achieve that: careful packing is.

Feed your friends

In addition to some sort of thank you meal afterwards, it helps to have a few drinks/snacks on hand for your friends who are helping. In the morning this can be coffee and donuts, or in the afternoon a cooler of sodas and some snacks, but make sure your friends stay well fed – particularly if you’d ever like their help in moving again.


My husband and I have a lot of stuff, and we managed to load up the truck in an hour and 45 minutes. We had 3 people loading the whole time, and 3 more who joined us about 45 minutes in. When we unloaded in Philly, we had a total of 12 people and got the truck empty in under 45 minutes. The longest part of the Philly leg of the trip was waiting for our cheesesteaks to be ready.

If there’s overlap such that you can get into both your old place and your new place, consider carefully whether it’s worth it to do the “trickle move.” Sure, you can move all that stuff one car load at a time over two weeks, but do you really want to? For this move we did take some stuff down in advance – since moving my Vespa is sort of an event we rented a van to move it and filled the remaining space with stuff we knew we weren’t using any time soon.

Moving doesn’t have to be a painful experience. It always sort of sucks, but you can mitigate the suck by staying organized.

Meta

To Watermark or Not To Watermark?

I have a love-hate relationship with Pinterest. I enjoy browsing the site to see new ideas for organizing and decor, but more often than not when I follow a pin to the source I find an orphaned image. These images are often sitting unaccredited on Tumblr and have no background information to tell me more about what’s going on. I know at one point these images had parents, probably blog articles, but through sharing and re-sharing the original content has been lost. On more than one occasion, I’ve found things on Pinterest with a description which I knew to be completely incorrect.

I spend a lot of time on my own photos for my blog, and a few of them have made the rounds on pinterest/etc. I’m contemplating watermarking my images with my blog URL. This isn’t because I’m concerned about “stealing,” in fact I love it when people reblog my stuff, it’s about attribution. It’s about someone seeing something I’ve done and having a snowball’s chance of learning more if they’re interested.

If someone wants a watermark-free copy for use on their blog or whatever, I’m more than happy to provide it. The image above shows what I’m thinking of adding to my photos from here on out.

So what do you think? Is the watermark shown above an acceptable way of “claiming” my content, or just it just distract too much from the image to be viable?

New Construction Townhome

On Home Decor Trends

The Restoration Hardware catalog = going over to the home of Howard Hughes, if he were a giant robot & married to a gay solider from WWII.” – Millie De Chirico

I know I’ve been looking at home decor catalogs too much lately, because when I read this I laughed so hard I started hyperventilating. The latest post on Offbeat Home also resonates with me, since I use Pinterest to get ideas for organizing and end up just rolling my eyes at the same ridiculous styles that keep popping up. “[Frack] you, decorative typewriter,” indeed.

Now back to finding the perfect spot for my vintage sewing machine…

Software

Domestic Adventures: Cat 6 Ethernet and Daily Calendars

Things have been quieter over here lately, but busy on Kellbot’s Domestic Adventures, the part of my blog dedicated to home and personal posts. It’s a little tricky to balance what goes where, so for overlap posts I’ll provide a summary. If you’re not reading it, here’s some of what you’ve missed:

Wiring for Cat 6 Ethernet

It’s been a little  tricky to balance what posts go where, especially when they’re home improvement hacks. The second post in the series about our home network is now up!

A script to generate a daily chore calendar

Cleaning Calendar

Because I’m a slob, I have to have a daily check list every day to tell me to clean up. I converted an old page-a-day calendar into a daily chore checklist, with help from Ruby and ImageMagick.


New Construction Townhome

Wiring the House for Ethernet

The biggest part of setting up our home network was wiring the house for ethernet. There were two basic phases: running the wire through the walls, and then terminating/testing each wire to make sure it was set up correctly. We hired a family friend who is an electrician to run the wires, and then terminated/tested them ourselves. We installed a total of 34 lines across 4 different floors, all coming into the closet under the staircase.

Cat6 Basement

Running the wires proved to be a bigger challenge than expected due to the fact that all of our walls were filled with insulation. A number of access holes had to be cut in the drywall in order to access everything. Four separate boxes of Cat 6 ethernet cable were used, so that multiple lines could be run to the same location at once. The free end from each spool was taped into a small bundle and a long metal wire with a hook was run from the target location (say, the bedroom), through the walls, and into the basement where it was attached to the end of the cat 6 bundle. Then the wire was pulled back up through the walls, bringing the cat 6 cable along with it.

Cat6 wall
Wires coming into our home office. The orange ring gives the faceplate something to screw into.

Each location in our house got either 2 or 4 wires, depending on how many devices we planned to put in that area. For every location in the house we needed either two or four RJ45 keystone jacks (one for each wire) and a faceplate with an appropriate number of holes. Keystone jacks are available in two basic formats: the standard kind which require a punch-down tool to terminate the wires and a “tool free” type which includes little caps which punch the wires down automatically. I personally prefer the standard jacks.

Cat6 Keystone
The near side of this jack (white) has been punched down, the far side is still waiting to be done. Each strand of the blue cat 6 cable goes into its own slot on the jack. Color codes on the side tell you where to put each wire. Monoprice included a handy little holder (black) to place the jack in while punching it down.
The two keystone jacks have been pushed into the faceplate, which is waiting to be screwed into the wall.

The opposite ends of the cables, which are bundled in the basement closet, get a slightly different treatment. Instead of going into individual jacks, they’re terminated in a patch panel. We used two 24 port patch panels, placing 16 connections on one and 18 on the other. We’ll be mounting these in our server rack, but if you’re going for a minimalist build there are inexpensive wall-mount brackets.

Cat6 PanelEmpty
Two patch panels, one face up and one face down. The black thing on the right is a rack-mount power strip.

Each wire was marked with a small letter or number at both ends. To keep everything in order and save my sanity, I used masking tape to temporarily keep the wires in alphabetical/numerical order.

Cat6 Sorted

Cat6 PanelBeck
18 cables have been punched down into the back of the patch panel.

Each jack in the patch panel is then patched into one of our network switches (which are each in turn plugged into the router) with a 6″ cable. Why not just go directly from the wall to the network switch? The patch panel gives you flexibility to change the network around later by moving the 6″ patch cables rather than tangling up the spaghetti coming out of the walls. Additionally, punching the wires down into the back of the patch panel is considerably faster than crimping a male RJ-45 connector onto the end of each drop.

Patch Cables

I briefly considered crimping my own patch cables from the leftover cat 6 cable, but then I remembered that crimping cable ends sucks and a 6″ patch cable costs all of $0.55. The photo above shows half our network cables, the other half are mounted on the back of the rack. I still need to install stress relief for the blue the cables and mount the router + modem nicely somewhere.

The server and switches are all connected to the LAN ports on the router. Our cable modem connection goes into the WAN port. Now the server and anything else on the LAN can see the outside world.

Overall it was a pretty massive project: it took three people a week to get all the wires in place and then another day and a half for my dad and I to button it all up. The next step is to configure the router for the advanced management options we want, as well as configure the wireless access points to provide “seamless” coverage throughout the house. The media server also needs considerable set up, right now it’s just a fresh Linux box with a giant hard drive. I’ll cover the software side of things in part 3 of Our Over-engineered Home Network.

This is part 2 of 3 posts about our home network.
Part 1: Our Overkill Home Network
Part 3: Coming soon