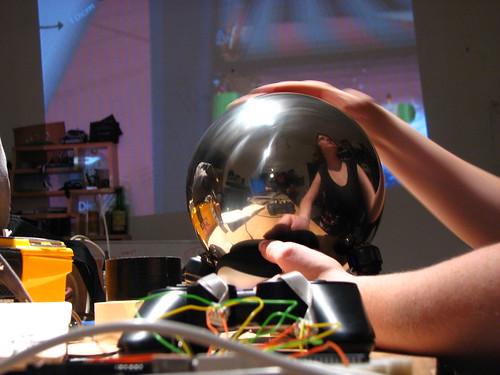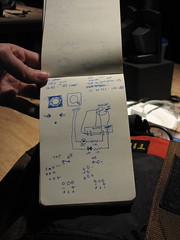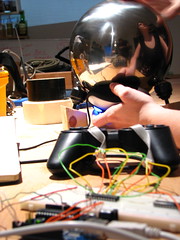
A long time ago, in a galaxy identical to this one, I wanted to make a life-sized Katamari, and use it to play Katamary Damacy on PS2. My friend Eric Skiff shot a video, and while it’s not quite a polished project, I decided it’s time to share it with the world.


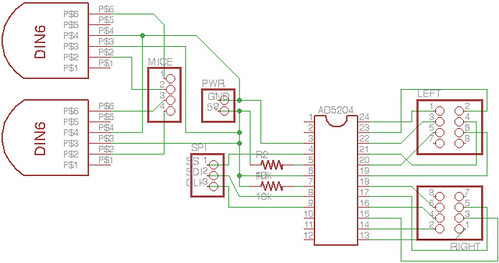
Here’s the wiring schematic. I realize it doesn’t make a lot of sense. Basically the each mouse (one for each joystick) is wired up to the Arduino, and there’s a handy PS/2 library for Arduino which makes it easy to work with. It was also the first Arduino program I wrote after “make an LED blink.”
I used an AD5206 digital potentiometer chip, although the 5204 would work as you only need four channels (left x, left y, right x, right y). It’s a pretty simple circuit, and maybe when I have some time I’ll redo it to use an AVR and a single power source. It was a fun first electronics project.
Originally I wanted to use one of those giant yoga balls, to really get the scale. But it turns out those don’t roll very well on ball bearings. Luckily Adam had one of those mirror balls folks put in their gardens. Or at least I assume they do, no one I know has a big enough yard to put lawn ornaments in. While somewhat smaller and less impressive, it rolls much more easily.
This project wouldn’t have been vaguely possible without help from the fine folks at NYC Resistor, who very patiently explained things like “why do I need a pull up resistor?” Extra thanks to Eric who documented my work (something I forget to do) and Adam who helped me with EAGLE. Sadly I never did get around to properly etching a board for it (but I did have a lot of incorrectly etched boards).
You can find the music from the video at http://glitchnyc.com/music/

Ah yes the LED blink project….
I decided to make a bigger light blink after that.
http://welcometochrisworld.com/2009/04/16/blink-on-steroids/
This is brilliant, and could have some awesome applications for handicapped people!!! Parkinsons patients in particular could use something like this (maybe not quite as big, but you never know) for navigating the web. Mice, trackballs, and trackpads all have problems for certain handicaps. This is brilliant. I play katamari damacy, and I want one!!!
I’m very interested in this project; it would be a perfect gift for my brother, and I’m just getting in to hobbyist electronics. Could I just ask where the Arduino goes in the wiring diagram above? 🙂 Is that what the Left/Right things are? Could you mention which Arduino chip you’re using at the moment?
Thanks,
Creidieki Crouch
For the quick flip (pushing down both analog sticks) you should get an “easy” button to mount in front of the steel ball.
Nice one – you made Fark as “Spiffy”!
May I suggest using nylon wheels (not metal spheres) as ball supports? These were used as idler wheels in opto-mechanical mice and trackballs.
Nylon will run silently, eliminating the metal-on-metal squeeky noises.
Awesome!
Kelly,
I believe Eve on this list e-mail me about your ingenious device. Makes a great project. This awesome device you created would be very useful to many people with disabilities. I first thought of cerebral palsy because of their difficulty with fine motor skills. And parkinson’s disease is similar relating to fine motor skill. The large ball would probably make it much easier. I am going to spread word about your project to those with disabilities. I also have taken many assault state electronics courses and run a website for people with disabilities and I have a disability called Duchenne Muscular Dystrophy. I am very interested in how you created your device and connected to the PSP. Do you think it would be a easy step to use a USB mouse? That would allow it to be very easily a Mac or PC control. What do you think Kelly? Would you be willing to answer questions about creating your device. Hopefully somebody will use your device as an example and create something for people with disabilities without the arm and the leg cost of assistive technology devices. See many people with disabilities either cannot build this themselves or do not have someone that can build it. Did you ever think of getting into assistive technology device and not just this wonderful device you have here? You have wonderful ingenuity.
Sincerely,
Timothy A Carey
Kellbot,
How did you get STARTED with any of this electronics stuff… I want to try to get into this sort of thing, too. Can you provide any suggestions on how someone with NO knowledge can get started?
Thanks and keep up the neat work!
Hi Cindy,
I started with an arduino – http://www.arduino.cc – there are a bunch of tutorials on the Arduino site which make it a good jumping off point.
Brilliant stuff Kell! Bravo!
Kellbot, go to Fark’s photoshop project and photoshop your tinysaurs! Check it out to see what I mean: http://www.fark.com/cgi/comments.pl?IDLink=4519758
Hmmmmm….. How to use a giant, soft, rubber ball…..
Well, one option that springs to mind is to use a large ‘cup’ to hold it, lined with something like strips of UHMW polyethylene to reduce friction. Another (geekier) option would be to pierce the cup with hundreds of small holes and levitate the ball with air, a la air hockey. You could have a smaller, solid rubber ball sitting in a hole in the middle that would work like your metal one. There would be plenty of rubber-on-rubber friction to make sure that the yoga ball movements were accurately represented.
can you power the AD5204 without the arduino ? nice blog
@cristi Yes, you can power it from any +5V power source.
Hi !
I would like to ask you if there is a schematic for connecting a mouse to an analog potentiometer without the Arduino schematic.
Could you provide the wiring/coding needed to make a PS3 version?
I ask this because you would be able to eliminate the PS2 controller altogether and just have the microcontroller report itself as an HID compliant controller to the PS3.
I am very interested in Tim and Eves comments. Before I even saw this video, I was building a giant trackball for my daughter who has Cerebral Palsy and none of the ‘adaptive’ equipment out there seemed to work, because they all call for some type of fine motor control. So I decided to build one. Prototype #4 just became operational yesterday. I am using a 6 lb. bowling ball as the ball (sanded with 400 grit sandpaper to give it a matte finish and read better with the laser), a standard laser USB mouse mounted underneath the ball, and a software package (demo) called PointSmart to reverse the vertical movement and slow down the tracking speed. The real problem that I am having is the mounting mechanism for the bowling ball. My first prototype was using a bearing tripod similar to what is shown on the video, but with a nylon roller ball and a nylon cup thinking that (similar to a comment above) that nylon should contain the noise and provide nice smooth movement. Turns out that there wasn’t enough friction between the ball and the nylon to actually turn the bearings so the ball just slid, but not very smoothly. Prototype #2 used three stainless steel roller rods (similar to an actual arcade trackball) but I ended up with the same problem in reverse, there was too much friction between the bowling ball and the stainless rods. Prototype #3 used nylon slides, no bearings at all-utter failure. Prototype #4 is using almost exactly what is shown on the video, a 1″ spherical stainless steel bearing tripod (these units are actually called ‘Ball Transfers’ if you try to look them up on the internet). They do provide the ease of movement that I am looking for, but are very noisy. The noise actually doesn’t come from the contact of the trackball and the bearing, but from the internal mechanics of the bearings themselves. Each of those 1″ stainless spheres that the bowling ball sits on in turn sits on a dozens of smaller bearings, allowing the 1″ ball to turn freely. It is the 1″ bearing turning against all of these little bearings that provides all the unwanted noise. They also do run a bit rough, since they are quite cheap.
The other thing that I did was wire in 1/8″ stereo jack into the left mouse click button and built a giant pushbutton as the mouse click. So instead of trying to fiddle with a small mouse button, my daughter can just mash the big button when she needs to click.
Next steps: I am finally going to shell out the cash for a set of precision ‘clean room’ type bearings used in precision medical equipment or similar. They tend to run about $30 each, so you can see why I have tried everything else first, but that should finally provide the smoothest movement, and cut down the noise.
Sorry for the long post, just interested, thanks.
Steve,
Thanks for the details–I’m interested in trying something similar. Any updates on how the expensive bearings worked?
That’s great that all you could do it without building a circuit–I wasn’t clear on why the original needed one.
This is extremely well engineered. I wish you the best of luck with your project and hope you push it further!
Just got my arduino in the mail and completed the blink an led project! 🙂 Excited to start learning about this stuff…but I thought I’d jump right in like you and want to create something similar to your project.
Did you use a PS/2 mouse or was it an optical mouse? I looked at the PS/2 lib and it appears all I’d really need to do is use the sketch that comes with it (http://www.arduino.cc/playground/uploads/ComponentLib/mouse.txt) and then use your your diagram to wire it up, does that sound about right?
Did you have to create or customize a sketch in any way to work with the pot?
Any feedback would be greatly appreciated!
Thanks!
P.S. – You were my “inspiration” to dive into the world of arduino, saw this post and said what the heck is arduino??? A few days of research and reading…ordered one online! 🙂 Next stop….radio shack….and then….countless sleepless nights…. 🙂
Kelly would you be interested in helping to develop your gadget for people with disabilities that lacked fine motor skills. It would help them use a computer more easily.
Maybe a university would be interested in helping transition that. The Eva who commented on your device Is From Yale University. Could get you in contact with her also.
Timothy Carey
Hi Tim,
I’d love for this work to help people who otherwise have trouble with traditional interface devices. Unfortunately at this time I don’t have many hours to put into the project, but would love to see what other people come up with.
Do you think you could post somewhere the programming that went into the arduino?
Unfortunately I think I managed to lose it. But if I come across it, or end up rewriting it, I will definitely post it.
Hi – just thought you might like to see this, since you were a HUGE part of convincing me it was possible! 🙂
http://ubercoolstuff.myshopify.com/blogs/news-events/8124883-nuit-blanche-rolling-up-the-cosmos
This is really great, I’m so glad you did this!
Hi Kelly just curious what have you used for the 4 bearing balls that support the main ball? I’m thinking of incorporating something like this into an old arcade machine.
With a amount of variants and easy to learn and play tips, you just can get a key to everything about fun in here.
Skateboard clothing is among the most popular street wear that you will be
planning to find anywhere. Skateboarder must always find the beloved shoes that
are specially designed for skateboarding.
I suspect however that our reality iis often a multi-path
reality, for reasons quite apart from invoking parallel universes, an infinitely cyclic universe, the Multiverse or perhaps the Many
Worlds Interpretation of quantum physics (all of which do result in multi-path
realities). Lets look at the benefits and disadvantages of jumping on the virtual train:Advantages:.
It speeds up navigation within the view port by displaying different objects,
depending on their distance from your viewer.
Technically speaking, these shorter boards are referred to as poolboards, but they’re usually lumped
within longboards because they’re more much like longboards compared to
the modern-day skateboards. This is the reason I took up skateboarding myself, well, that along with the chance to get acquainted with some chicks, and I guess that
comes beneath the fun umbrella too. Pop an ollie then while doing
this, flick over foot on the board’s side in anticipation of having completed
a rotation.
Any message you have to your prospective customer, really should have in it a
title or even an opening that ought to be of curiosity
for a prospects. This wull be your sales and marketing hub,
where you’ll write articles, reviews and even videos. If you forget about the effect and influence of
search engine marketing in web business; just be certain your business’s survival chance is quite
bleak and minimal.
If you choose that you’ll need a tent, the good thing is
there are many lightweight 1-3 person tents on the market today.
After all, One man tents have a tendency to only have enough room that yoou should sleep
in, so how are you going to puut all that extra gear.
Height and Head space – Being able to sit upright, without the stooping
makes a tent much more comfortable, specifically weather conditions are bad and you are spending extended periods of your time within your tent.